Mostrando entradas con la etiqueta Continuous delivery. Mostrar todas las entradas

sábado, 16 de mayo de 2020

[EN] How to update backend servers on HAproxy using HAproxy API (and not reloading config)

The HAproxy API is a great tool to interact with the configuration, updating it without the need to reload after every change (which is completely safe as stated here). In this case, I am just going to add and remove a backend server, so you can see how it works and how powerful it could be

I am going to use netcat instead of socat, but the result will be very similar.

When you configure your HAproxy, make sure that the backend block will have the server definition, which is going to be something like

> server-template websrv 1-100 192.168.122.1:80 check disabled

where

    server-template is the section of the block
    websrv will be the name of the backend servers, followed by a number
    1-100 is the range for that number that will complete the name of the backend servers
    192.168.122.1 will be an template address, but make sure that you have nothing there (you can set any IP you want)
    80 is the port you are balancing the traffic
    check disabled is an option, but we don't really want the check to be enabled because the host IP won't pass the check

You can add more options if you need, but that's a basic example.

Another important thing you need to know or count with is the number of sockets your HAproxy will have, because you'll have to inform all of them about the changes you are going to make. Keep that in mind.

Once your haproxy starts, you have no backend server listening, and you need to any some; remember that the idea is that you run a background process to update those servers.
The commands to enable and add a new backend server are

> echo "set server #BACKEND_BLOCK/#WEBSRV_NUMBER addr #IP_ADDRESS port #PORT" | nc -U #SOCKET
> echo "set server #BACKEND_BLOCK/#WEBSRV_NUMBER state ready" | nc -U #SOCKET

where
    #BACKEND_BLOCK is the backend block's name
    #WEBSRV_NUMBER is the backend server's name on haproxy
    #IP_ADDRESS is the IP of that new backend server
    #PORT is the port
    #SOCKET is the HAproxy socket you are talking to

After running the first command, your HAproxy will notify the changes (IP and port if they have changed), and after running the second command there will be no output.

> echo "set server backend/server50 addr 1.1.1.1 port 8080" | nc -U /var/run/haproxy.sock

IP changed from '192.168.122.1' to '1.1.1.1', port changed from '80' to '8080' by 'stats socket command'

> echo "set server backend/server50 state ready" | nc -U /var/run/haproxy.sock


and this way your HAproxy instance will start to send traffic to that backend server. If you have more that one instances of HAproxy running, you'll have to spread the changes to all of them; the command would be the same, just change the socket you are talking to.


In the case you want to put a server in maintenance state (so disable it), the command would be

> echo "set server backend/server50 state maint" | nc -U /var/run/haproxy.sock

Besides ready and maint, there is a thrird state of haproxy: drain; in this state the backend server is removed from the Load Balancer, but still allowed it to be checked and to accept new persistent connections.

Source: HAproxy.com

miércoles, 20 de febrero de 2019

Pinceladas de git

Hoy traigo otra cheat sheet, esta vez se trata de una chuleta de comandos git. Para el que haya llegado aquí por casualidad, git es un software de control de versiones muy utilizado no sólo por equipos de desarrollo sino por cualquiera que prefiera trabajar con un repositorio seguro.

En este caso, quiero que le echéis un ojo a esta chuleta; las hay mucho más completas con miles de comandos, pero esta me gusta porque es muy simple y sencilla, y para alguien que está empezando o que sólo hace tareas más básicas, es genial.


No dispongo de la fuente original, ya que esto lo saqué de Pinterest, de una cuenta que sigo, pero si alguien la conoce, que me lo haga llegar y prometo actualizar el post.


Muchas gracias!

lunes, 24 de diciembre de 2018

Pinceladas de Docker (IV) - Comandos

Hacía tiempo que quería subir una pequeña receta con los comandos de docker que más utilizo y que pueden ser útiles a alguien, y ya tenía el post escrito cuando he encontrado una sheet que me parece muy útil y totalmente recomendable, muy completa y muy organizada. Así que en lugar de subir mi artículo, os dejo esta sheet que os va a ser mucho más útil.

Si hacéis click sobre la imagen se hace más grande; o podéis descargarlas en formato PDF para tenerlas siempre a mano aquí.


Fuente: Linoxide.Com

jueves, 22 de junio de 2017

DevOps, A New Hope...

Hace unos meses que llevo con una serie de entradas dedicadas a Docker en especial, aunque el último (penúltimo) post introduje lo que (para mí, porque hay mucha literatura sobre el tema) son los principios de la filosofía DevOps. Según la wikipedia, este nuevo movimiento lo que busca es la automatización y monitorización de todos los estadios de la construcción del software, además de abogar por ciclos de desarrollo más cortos y más frecuencia de implementación  dando como resultado la construcción de software más confiable.

Para llegar a ese estado ideal, se marcan tres fases importantes, aunque después de la primera viene todo más o menos rodado, que serían

- Integración Continua (Continuous integration -CI- en inglés): Seguro que has escuchado este término alguna vez, pero si no lo has hecho que sepas que es el proceso por el cual el nuevo código se integra a menudo, por ejemplo cada pocas horas, siendo así posible la detección de errores lo más rápido posible, y para ello también se añaden una serie de tests y controles para localizar problemas o bugs fácilmente.

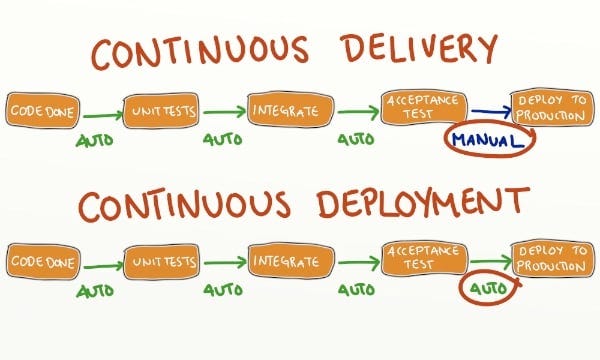
- Entrega Continua (Continuous Delivery -CD- en inglés): En esta fase la automatización es muy importante, ya que se definen más test y controles para que las subidas se puedan automatizar y sean más fiables. Estas nuevas pruebas van orientadas a mantener la calidad del software y a confirmar la integridad del código. Una vez el código ha superado todas las pruebas y mantiene la calidad deseada, se puede automatizar la subida al entorno de producción, aunque esto ya entraría en el terreno de un "continuous deployment"


Hay otras fases como la monitorización continua que yo personalmente no las considero fases propiamente dichas sino más bien parte de la carrera de fondo de un departamento de sistemas

Cada una de estas dos fases tienen software que nos ayuda en la implementa-ción de todas esta manera de trabajar, pero eso lo iremos viendo. Sólo una pincelada ya que hemos hablado de docker: al trabajar con contenedores se minimizan los fallos derivados del entorno, por lo que cualquier cambio o implementación que tengamos que hacer es mucho más fluida.


Saludos y gracias!