sábado, 16 de mayo de 2020

[EN] How to update backend servers on HAproxy using HAproxy API (and not reloading config)

The HAproxy API is a great tool to interact with the configuration, updating it without the need to reload after every change (which is completely safe as stated here). In this case, I am just going to add and remove a backend server, so you can see how it works and how powerful it could be

I am going to use netcat instead of socat, but the result will be very similar.

When you configure your HAproxy, make sure that the backend block will have the server definition, which is going to be something like

> server-template websrv 1-100 192.168.122.1:80 check disabled

where

    server-template is the section of the block
    websrv will be the name of the backend servers, followed by a number
    1-100 is the range for that number that will complete the name of the backend servers
    192.168.122.1 will be an template address, but make sure that you have nothing there (you can set any IP you want)
    80 is the port you are balancing the traffic
    check disabled is an option, but we don't really want the check to be enabled because the host IP won't pass the check

You can add more options if you need, but that's a basic example.

Another important thing you need to know or count with is the number of sockets your HAproxy will have, because you'll have to inform all of them about the changes you are going to make. Keep that in mind.

Once your haproxy starts, you have no backend server listening, and you need to any some; remember that the idea is that you run a background process to update those servers.
The commands to enable and add a new backend server are

> echo "set server #BACKEND_BLOCK/#WEBSRV_NUMBER addr #IP_ADDRESS port #PORT" | nc -U #SOCKET
> echo "set server #BACKEND_BLOCK/#WEBSRV_NUMBER state ready" | nc -U #SOCKET

where
    #BACKEND_BLOCK is the backend block's name
    #WEBSRV_NUMBER is the backend server's name on haproxy
    #IP_ADDRESS is the IP of that new backend server
    #PORT is the port
    #SOCKET is the HAproxy socket you are talking to

After running the first command, your HAproxy will notify the changes (IP and port if they have changed), and after running the second command there will be no output.

> echo "set server backend/server50 addr 1.1.1.1 port 8080" | nc -U /var/run/haproxy.sock

IP changed from '192.168.122.1' to '1.1.1.1', port changed from '80' to '8080' by 'stats socket command'

> echo "set server backend/server50 state ready" | nc -U /var/run/haproxy.sock


and this way your HAproxy instance will start to send traffic to that backend server. If you have more that one instances of HAproxy running, you'll have to spread the changes to all of them; the command would be the same, just change the socket you are talking to.


In the case you want to put a server in maintenance state (so disable it), the command would be

> echo "set server backend/server50 state maint" | nc -U /var/run/haproxy.sock

Besides ready and maint, there is a thrird state of haproxy: drain; in this state the backend server is removed from the Load Balancer, but still allowed it to be checked and to accept new persistent connections.

Source: HAproxy.com

jueves, 30 de abril de 2020

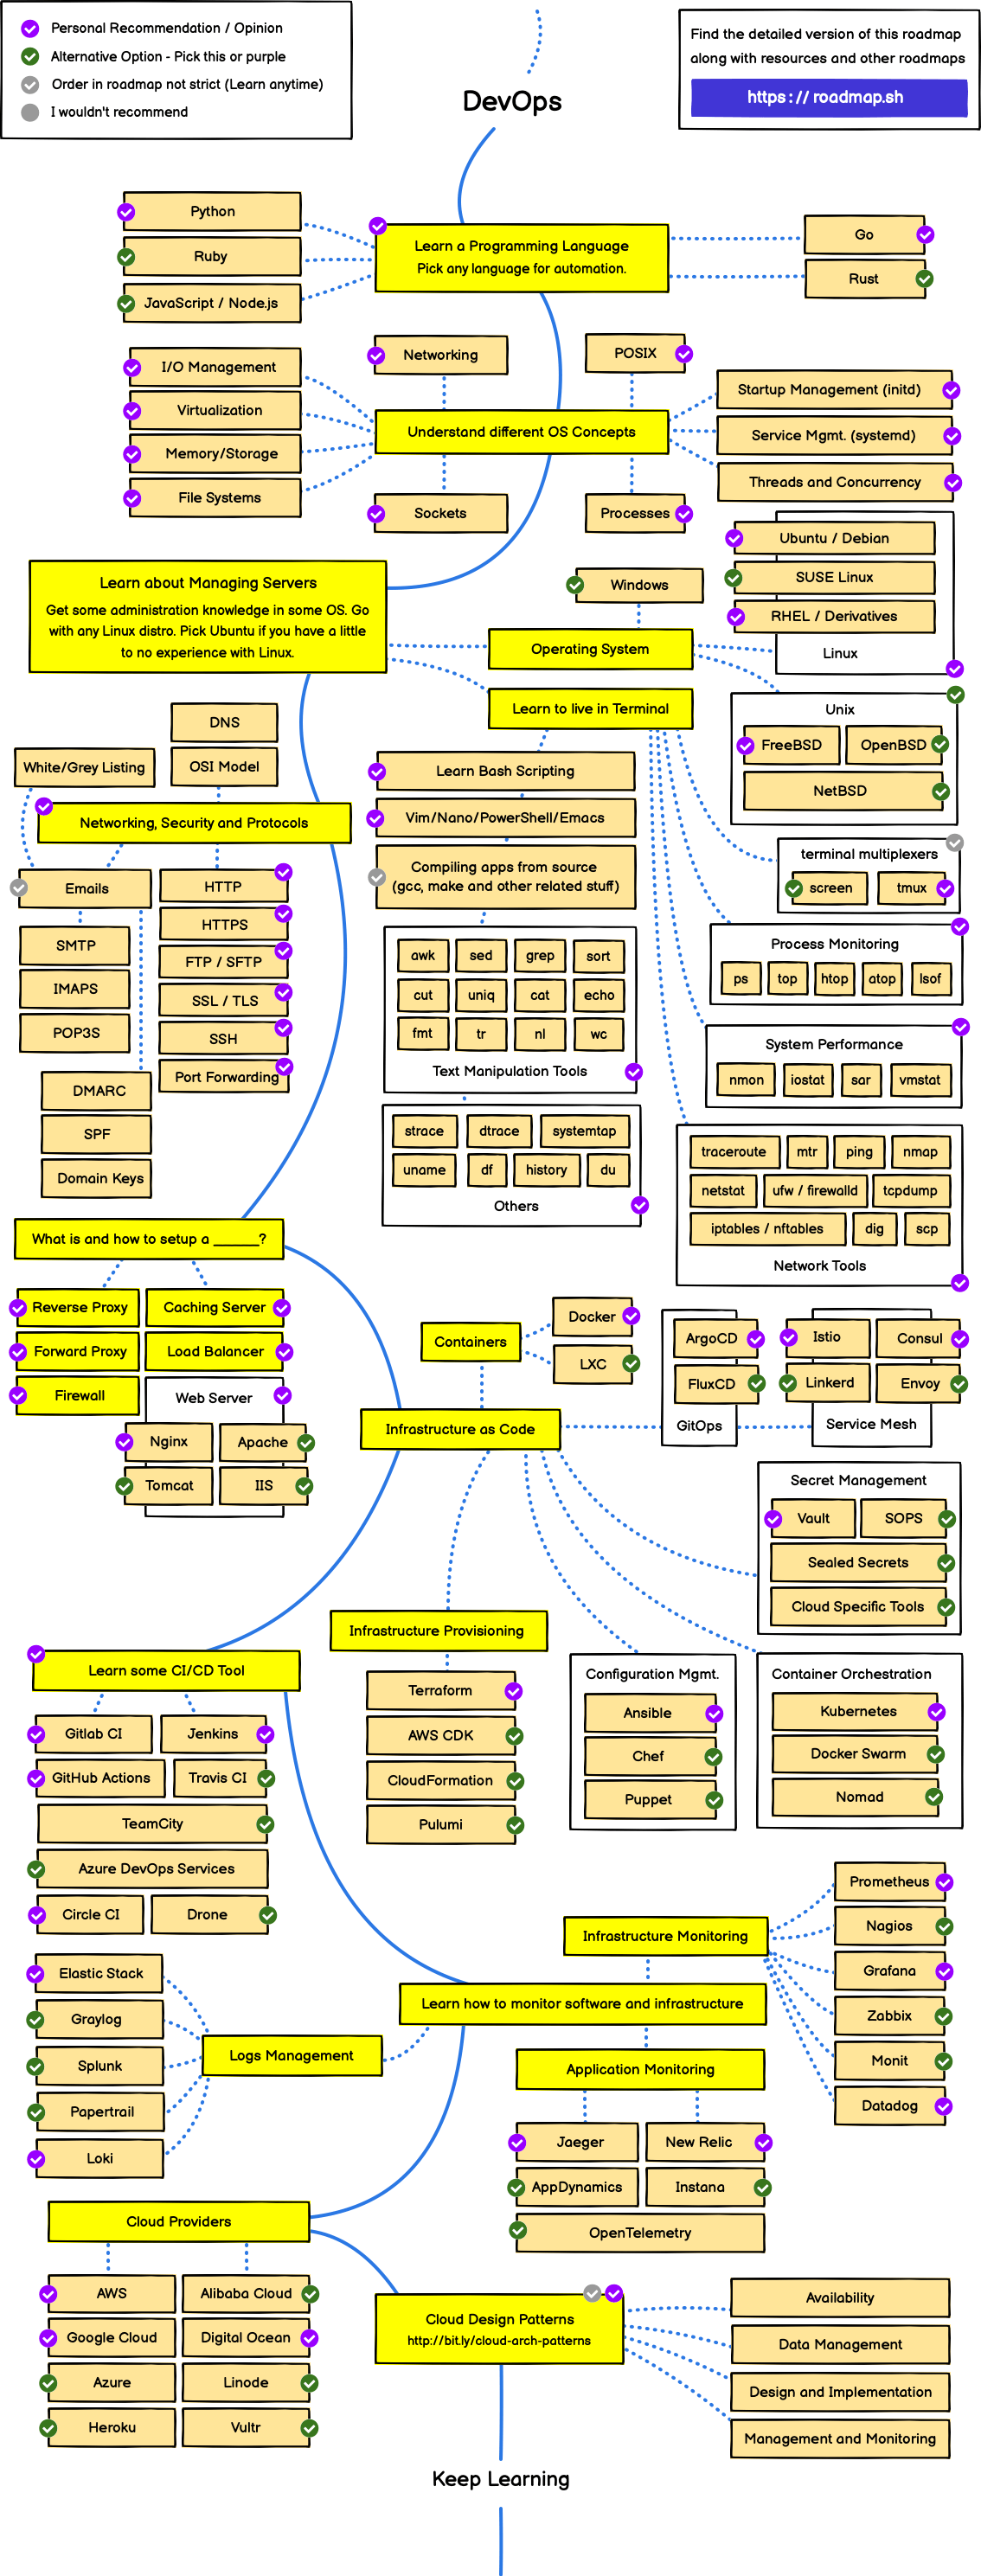
[EN] DevOps roadmap

Hello!

Today I come with a roadmap that someone sent me a few days ago. It is a roadmap of what (according to how it is understood by who has drew it) a DevOps should know.


You can more or less agree with what is in it, but it has helped me to get to know some new technologies that could be very interesting to me.

What about you? What do you think? One thing amazing is that you can suggest your changes, but I am not sure they would take them into account. Anyway, I have at least two suggestions, that are
  • HOW COME Debian is not in purple???
  • I know there is no Load Balancing section but they should include it somehow


Source: roadmap.sh
You have a few more interesting roadmaps in that page

sábado, 4 de abril de 2020

[EN] Regular Expressions

Hello everyone!

How do you carry the lockdown? At the moment nothing bad, taking advantage of the time to do things that before didn't have enough time to do.

One of these things is to study; I have finished with a very interesting 'sed' and 'awk' course, and I wanted to share some notes on regular expressions, to see what you think.

‘\b[Cc]olou?r\b’
\b :: boundaries, limits the word
? :: optional inclusion of this character
\. :: Exactly one single character
this example matches Color, color, Colour, colour

Anchors
'^' :: start of a string
'$' :: end of a string

Ranges
[] :: denote the ranges
'[A-Za-z]' :: any letter
'[0-9]' :: any number; it could be represented as \d
'[a-z_]' :: lower case character and underscore character
'[349]' :: matches number 3, number 4 and number 9; it would match 34, 49 or 349 because include those numbers
'[^4]' :: matches anything BUT 4
'[Ss]erver' :: matches Server and server

Boundaries and strings
\s :: any white space character (space, line return, tap) > \S :: NOT looking for a white space character
\b :: word boundary (may include hyphen as word separator) >  \B :: NOT looking for a word boundary
'\ssytem' :: Matches "file system"
'\bsystem' :: Matches "file system" and "file-system"
'\bpop[0-9]\b' :: Matches pop2 and pop3 but not pop3s (from /etc/services file)
'\bpop[0-9]\B' :: Not matches pop2 and pop3 but matches pop3s (from /etc/services file)

Quantifiers
'u*' :: Matches u zero or more times
'u?' :: Matches u zero or once only (optional)
'u+' :: Matches u once or more times
'u{3}' :: Matches uuu (u 3 times)


'^\s*#' :: Matches all kind of commented lines: with no space, with spaces and with tabs
'start\s*end' :: Matches all independently the spaces between 'start' and 'end'
'start\s?end' :: Matches 'start end' and 'startend'
'start\s{2}end' :: Matches the option with 2 spaces between 'start and 'end'
'[a-z]{2}[0-9]{1,2}' :: Matches a postcode [ab12 7af]; {1,2} means that it could happen once or twice

grep -E :: takes extended regular expressions :: egrep. RE are extended when they use {}, but not when they use []


sábado, 14 de marzo de 2020

[EN] Pills :: using grep and sed

Hello everyone!

Today I bring you a tiny grep pills, a couple of features that I did not know and I think they are very interesting


So let's go there:

Returns # of matches (similar to wc -l)
> grep -c pattern

Shows the line that matches and two lines after
> cat file | grep -A2 pattern

Shows the line that matches and two lines before
> cat file | grep -B2 pattern

Shows the line that matches, two lines before and and two lines after
> cat file | grep -C2 pattern


Extra pill: This reminds me that if you want to add a line to a file, for example, above or below a specific row, you can do it using sed

Imagine that you want to add a line to /etc/passwords file, one above and one below a user named 'esther'

Adds the new line just after the user that starts with 'esther'
> sed ' /^esther/ a newuser:x:1001:1000:New User:/home/user:/bin/sh' /etc/passwd

Adds the new line just before the user that starts with 'esther'
> sed ' /^esther/ i newuser:x:1001:1000:New User:/home/user:/bin/sh' /etc/passwd


domingo, 23 de febrero de 2020

[EN] Nmap cheat sheet

Hello again,

nmap is a wonderful tool, very powerful and with which you can do a lot of things. I love it, it is one of the first utilities that I install on a new system, and I have found this cheat sheet that you will love for sure!


I have it to consult it often, so you will tell me if it is also as useful to you as it is to me.

Source: Sans.org

viernes, 24 de enero de 2020

[EN] [OOC] My first tattoo

Exactly a month ago I did a little crazy thing that I wanted to do for a long time and I got my first tattoo. Now healed and perfect, it looks like this


Just wanted to share it with you, I hope you like it!

martes, 24 de diciembre de 2019

[EN] How IT people see each other

Have you ever thought about it? Like SysAdmin or DevOps, how do you see the other colleagues in the IT department? And best of all, how do you see them?


I have to confess that as SysAdmin, sometimes I find myself thinking the same thing ... doesn't it happen to you?

Anyway, just wanted to wish you have a Merry Christmas and a really Happy 2020!

viernes, 29 de noviembre de 2019

[EN] Cleaning old systemd journal logs

Have you found that your folder is too big?

esther@Raton:~# du -hs /var/log/journal/
6,5G    /var/log/journal/

or

esther@Raton:~# du -hs /run/log/journal/
2,5G    /run/log/journal/


And have you found that once there you can't read any log messages?

esther@Raton:/var/log/journal/xxxxxxxxxxxxxxxxxxxxxxx# tail system.journal
L�8M�ތp�+2uW����.��+0OÈ�
                         �+B�ةO\@H�+ւ���|�X��+.�{EPр�+��)���ב�+o�
                                                                 �PX���+q���r�� �+"��)F���+�N��6���h�+l@����+n��Bm�B���+�{۳O�z�h�+�Z-9a���+"_�����+*(W4W8,FP�2���*�땠�OT� %$�����.fV�9P�| �J�8��8������3.��p�MESSAGE=XXXX [...]


Don't worry, that's pretty normal.

First of all, you can read your systemd journal log files just using

>  journalctl

and explore its options; some pretty useful may be
     --system                Show the system journal
     --user                  Show the user journal for the current user
  -r --reverse               Show the newest entries first
  -o --output=STRING         Change journal output mode (short, short-precise,
  -a --all                   Show all fields, including long and unprintable
     --vacuum-size=BYTES     Reduce disk usage below specified size
     --vacuum-files=INT      Leave only the specified number of journal files
     --vacuum-time=TIME      Remove journal files older than specified time


For example, for cleaning old files we have different ways using the last three options

> journalctl --vacuum-time=15d
> journalctl --vacuum-size=1G

Or you can check the live logs from a systemctl service using

> journalctl -xef -u systemctl.service

domingo, 13 de octubre de 2019

[EN] How to enable telnet feature on Windows 10 system (it works with HOME edition)

Hi all!


Just wanted to leave a tiny little recipe to enable TELNET on Windows 10 from the command line; as a good Linux user I LOVE the command line... so... here we go!

Just need to run this command

dism /online /Enable-Feature /FeatureName: TelnetClient


from the Symbol System window and your system will do the rest


Hope that helps!

sábado, 21 de septiembre de 2019

[EN] Hacking Tools cheat sheet

Hello!!!

Today I wanted to share that Hacking Tools Cheat Sheet where you can find very interesting commands and tools.

Use them wisely; you know, a great power entails a great responsibility


domingo, 25 de agosto de 2019

[EN] MySQL/MariaDB: filtering processlist query

Haven't seen you in a while... but today I bring you something really interesting I just found out


I'm pretty sure you already know about

mysql> show processlist;


that shows you all the threads that MySQL is running for your user (or all the users if you are root) in that very moment; the problem of that query is that you can't limit or filter it at all and sometimes you need to. 

The cool part is that you can run the same query using

mysql> SELECT * FROM information_schema.processlist;

and filter it as you need!!!!

mysql> SELECT * FROM information_schema.processlist where Host='remote_host';
mysql> SELECT * FROM information_schema.processlist where User='remote_user';

That really made my day! 
And yours?

viernes, 10 de mayo de 2019

[EN] AWS - An UnauthorizedOperation and encrypted message

Have you ever tried to perform a change from the aws command-line and all you got was an error like

"An error occurred (UnauthorizedOperation) when calling the XXXXXX operation: You are not authorized to perform this operation. Encoded authorization failure message"

and an encrypted string afterwards? Well, don't panic. It's just a "normal" error, but in this case the output is encrypted for security; aws api does so becasue it throws some sensible information and they don't want anyone else but you to get it. 


How to decrypt that info? Easy; you need an allow policy on STS for the action DecodeAuthorizationMessage. If you already got permission, you don't need to create the policy, but if you need to just copy and paste it


{
    "Version": "2012-10-17",
    "Statement": [
        {
            "Sid": "VisualEditor0",
            "Effect": "Allow",
            "Action": "sts:DecodeAuthorizationMessage",
            "Resource": "*"
        }
    ]
}

Once the policy has been applied, you can decrypt the error with

> aws sts decode-authorization-message --encoded-message Error_Message_Encrypted_String --output table

where Error_Message_Encrypted_String would be the message you got.


Hope that helps!

miércoles, 17 de abril de 2019

[EN] Setting open descriptors on Ubuntu18.04

Hello! this is a tricky question; many times you are used to do something in an special way but suddenly, one day it doesn't work. That's what happened to me with open file descriptors on Ubuntu 18.04.
 By default this Ubuntu release has

esther@host:~# sudo ulimit -n
1024
esther@host:~#

which may be very little if you plan to run, for example, an nginx server. If you want to change that value, you have to

1) edit /etc/sysctl.conf and add

fs.file-max = 65535
fs.nr_open = 65535


at the end of the file

2) edit /etc/security/limits.conf and add at the end

* soft     nproc          65535   
* hard     nproc          65535  
* soft     nofile         65535  
* hard     nofile         65535
root soft     nproc          65535   
root hard     nproc          65535  
root soft     nofile         65535  
root hard     nofile         65535

3) check that 
/etc/pam.d/common-session 
/etc/pam.d/common-session-noninteractive 
contain

session    required    pam_unix.so

which is the default configuration for the pam.d service; if you need to update any of those two files, restart the pam.d service.

If you have done all of those changes, reload them and check if still have the same values

esther@host:~# sudo sysctl -p
esther@host:~# sudo ulimit -n

shows the default value, make one last change on /etc/systemd/user.conf and set

DefaultLimitNOFILE=65535

Save and restart... and check it again ;)

martes, 2 de abril de 2019

[EN] rc.local on Ubuntu 18.x

On Ubuntu 18.04/18.10 I have missed the rc.local file that had helped me a few (thousand) times. Have you missed it too? By default, the file does not exit, but the service behind is present, so not everything is lost.
If you want to enable this feature on your Ubuntu, you are just few steps away.

First of all, let's create the file and set the correct perms

> touch /etc/rc.local
> chmod +x /etc/rc.local

and then let's give it the correct format


> echo "#!/bin/bash
exit 0" > /etc/rc.local


and it will work. You can check the state of the service as well with


> systemctl status rc-local

and start/stop it if you want to make any test.

martes, 26 de marzo de 2019

[EN] High CPU -> Ubuntu + Docker + Jenkins

Sometimes, suddenly a Jenkins environment can turn upside down and take all the CPU resources even when no job is being processed. Any job launched gets eternal and the CPU load gets so high that almost reaches the moon while you try to fix it with no luck at all.

In that moment, a good idea may be clean old jobs and update your Jenkins.


For cleaning old builds
  • find out which is your jenkins home (you can get it from "Manage Jenkins" -> "Configure System" -> "Home Directory")
  • navigate to that directory, and then move inside the 'jobs' folder. Those are your jobs, and inside each of them there is a "builds" folder that keeps the builds. Delete as much as you want, let's say leaving just one month.
  • after that, reload your configuration; you can restart your container

  •   > docker container restart jenkins

    or just reload the configuration from "Manage Jenkins" -> "Reload Configuration from Disk" 

For updating your Jenkins (using Docker)
  • First of all, copy the war URL to download it; you can copy it from your Jenkins. To get it, go to "Manage Jenkins" and scroll to the top of the page; there is a warning if there are new available versions, and you can copy the link from there
  • Once you have your link, you have to download the war inside the container and move it instead the current; so lets get inside it using
  • > docker container exec -u 0 -it jenkins bash ##important you use "-u 0" option to force the user; otherwise bash may crash or have other issues
    >> cd /usr/share/jenkins
    >> mv jenkins.war jenkins-OLD.war
    >> wget http://updates.jenkins-ci.org/download/war/x.yyy.z/jenkins.war ## in your case, the URL you got on the previous step   
    >> chown jenkins:jenkins jenkins.war
    >> exit

  • now let's restart the container using

    > docker container restart jenkins

    log on on your Jenkins again, and check your installed plugins; some of them may be outdated and you'll have to make some adjustments.


miércoles, 20 de febrero de 2019

Pinceladas de git

Hoy traigo otra cheat sheet, esta vez se trata de una chuleta de comandos git. Para el que haya llegado aquí por casualidad, git es un software de control de versiones muy utilizado no sólo por equipos de desarrollo sino por cualquiera que prefiera trabajar con un repositorio seguro.

En este caso, quiero que le echéis un ojo a esta chuleta; las hay mucho más completas con miles de comandos, pero esta me gusta porque es muy simple y sencilla, y para alguien que está empezando o que sólo hace tareas más básicas, es genial.


No dispongo de la fuente original, ya que esto lo saqué de Pinterest, de una cuenta que sigo, pero si alguien la conoce, que me lo haga llegar y prometo actualizar el post.


Muchas gracias!

lunes, 24 de diciembre de 2018

Pinceladas de Docker (IV) - Comandos

Hacía tiempo que quería subir una pequeña receta con los comandos de docker que más utilizo y que pueden ser útiles a alguien, y ya tenía el post escrito cuando he encontrado una sheet que me parece muy útil y totalmente recomendable, muy completa y muy organizada. Así que en lugar de subir mi artículo, os dejo esta sheet que os va a ser mucho más útil.

Si hacéis click sobre la imagen se hace más grande; o podéis descargarlas en formato PDF para tenerlas siempre a mano aquí.


Fuente: Linoxide.Com

lunes, 29 de octubre de 2018

Distribuciones Linux

¿Sabéis cuántas distribuciones linux "oficiales" hay? 10? 20? Pues no, son unas cuantas más...
Os dejo una imagen de la wiki donde están todas las distros, de dónde salieron y las escisiones que se han formado. Podéis acceder a la web aquí